Notes from Ed's June 6-7, 2005 Visit
Here is the jar of our activites after Ed fixed the bug:
Rescue: 4 scenes file
Ed Burke visited SRI again on June 6-7 to help us develop some pages for our first assessment. Edys, Geneva, and Karen joined us the first morning to look at some demos and discuss general questions and issues. We ran through Pedigogical 1.0 examples from the Mac project, specifically, a car race/vector motion activity first. Next we ran through the Balancing Forces example.
What does Pedigogica log? Ed says Some things are done automatically, others you need to make explicit. For example, if you want to record when a kid presses a button, you need to explicitly script it to log that. For things like text boxes (a text prompt), Ed thinks it is recorded automatically. The developer just registers it as a question and then it's automatically logged. If you let kids go back and forth, and they go back and change a text box input, it will record that you changed it.
For the next two days, we decided to focus on prototyping the following scenes for the first 2-hour assessment activity:
- Show forces on a rescue sled
- Effects of surface speed on sled
Rescue activities
Setup
Launch ACE from http://wise25.concord.org/workspaces/wise25/Test/WebStart/ACE.jnlp or find ACE in from Pedagogica 2.0 Test by clicking on ACE. Once downloaded, the cache will be created on your machine under your user directory (whatever account you're logged in under) under .concord.org. On the mac, you can't see it because the directory starts with a dot, so create a symbolic link to it (e.g., ln .concord.org concord.org)
Ed set up a development jar for us that has initial nodes (Rescue 1, with subnode Sled Forces) and edited the classpath to include Collisions.jar in it. Right-click and download this jar to your desktop:
Rescue activity file
Put Rescue.jar inside of concord.org/workspaces/wise25/Test/Activity/
In ACE, click on the folder icon (Load Activity) and load Rescue.jar
Once loaded, you probably want to import commonly used libraries, like java.awt, java.lang, and java.awt.event to the class path. Import these packages by right-clicking anywhere, choose Edit Classpath and click classes.jar on mac or rt.jar on pc to find these packages, and add/import them. (Note that Edit Classpath is not context sensitive--you can do it from anywhere and the imports are global).
Day 1: Creating sled forces scene 1
What do we need? For the first page, we just let them run the simulation and play with it. We want a gui panel with a picture of a sled, a text field for the description below the simulation, a next and previous button, and a run and reset button. We'll also need manipulable vector arrows. We'll only make the down arrow editable (putting stuff on the sled to make it heavier or lighter).
Right-click on Sled Forces and choose Edit View. Then in new window, right-click and do New Placement. We'll place the simulation window. Click New Component to make it the right type and name it objectView. For the Class Name, choose Select Class and open collisions.jar and navigate down to ui.GUIPanel. For now, place the simulation panel in the center toward the top.
Let's set the snap-to-grid size to something bigger. Right-click and choose Snap To Grid and select 10.
Ed goes back up to the top (Rescue 1) level to write some scripts and see what is going on. He is looking at the boat activity code and creating analogous code based on that. To just test things, he adds this to the activity background (Rescue node) as well as the Rescue 1 node and Sled Forces node:
function enter() {
  System.out.println(currentNode.getName());
}
and let's run the activity. You'll just see the printouts from the script above (we haven't finished the view yet).
Note that the code will save automatically when you run it. There is no keyboard shortcut for Save, so click on the Save Activity icon frequently to be safe.
Patti found the following snow mobile icon for us to use, for now:

Ed inverts the background for the boat activity (blue water, white sky) for our sled background and Patti modifies the proportions; here is our background:

Download both of these images to your computer and import them into your activity. (Ed would like to be able to make it so folks can just include URLs to images on the web.) Right-click anywhere and choose Import, then navigate to add the images. (Patti had to import the two images separately, even though she selected both, but Zaz claims for her they both imported when she selected both.)
Ed discovers that he needs to import additional packages. Right-click and Edit Classpath and import from the collisions jar the following: org.concord.collisions.engine, collisions.ui, collisions.util, and collisions.event.
In the Sled Forces node, define the setupView function and call it from enter. Note that to be IN Sled Forces, you either need to have it selected (in which case it will be red), or go into it (in which case you won't see the node but you'll see the script on the right).
- Code convention: Consider putting in your script, in a comment at the top, the name of the node (e.g. // Load Sled) to help orient.
// Sled Forces
function enter() {
  System.out.println(currentNode.getName());
  setupView();
}

function setupView() {
	JPartWorld.setNeedScreenResolution(20)
	objectView.clearAll()
	objectView.clearBackgroundIcon()
	objectView.setBackground(Color.white);
	objectView.setBackgroundIcon(currentNode.getResource("Resources/snowBackground.gif").toString());
	objectView.setGrid()
	world = objectView.getWorldModel();
	objectView.setSnapToGrid(true, true)
	objectView.getGrid().setIntervalMajor(5,5)
	world.setDoAACollisions(true)
	objectView.setAtomsDragMode(GUIPanel.DRAG_MODE_NONE);
}
Now click the Run button. You should see your snow background with a grid on top of it!
Now lets create a variable for our sled atom and forces. In the background, define
var sledAtom;
var sledForces;
This is a newer version of the enter function that goes in Sled Forces:
// Sled Forces
function enter()
{
	System.out.println(currentNode.getName());
	sledForces = JImpulseDaemon.createMultiConstantForceDaemon(140,180,10,10,0,0)
	sledForces.setForceDrawMode(CCConstantForce.DRAW_MODE_ARROW);
	sledForces.clearForces();
	sledForces.setDragMode(GUIPanel.DRAG_MODE_FORCE);
	world = objectView.getWorldModel();
 	//world.addStepListener(stepsListener,50);

	sledForces.setDragMode(GUIPanel.DRAG_MODE_FORCE);

	objectView.setDaemonsDragMode(GUIPanel.DRAG_MODE_DAEMON);

	setupView();

 	sledAtom = JAtom.createAtom(140,180,10,5,0);
	sledAtom.setIconFromURL(currentNode.getResource("Resources/snowmobile.jpg"));
	objectView.setDrawAtomsThenDaemons(true);
	objectView.addElement(sledAtom);
	sledAtom.setProperty("showvel",true);
	objectView.addElement(sledForces);


	sledAtom.setProperty("showvelnumber",true);
	sledAtom.setProperty("dotrace",true);
	sledAtom.setTraceProperties(0,1,0.2*objectView.getWorldModel().getPxFromCm(1));
	objectView.setShowUnitLabels(true);
	objectView.setShowForceNumber(true);
}
Now we need to create handlers to respond to events, so we have to decide EXACTLY how it will behave. We'll put these actions in Sled Forces. In the example with the boat, there is one big action handler that checks the source to see what button you pressed and dispatches things. We all prefer to modularize by creating separate handlers and listeners for each button. Using Rhino implementation of javascript, you can pass an object to an interface and it will look for methods of particular names (like actionPerformed) on the object and run it when appropriate.
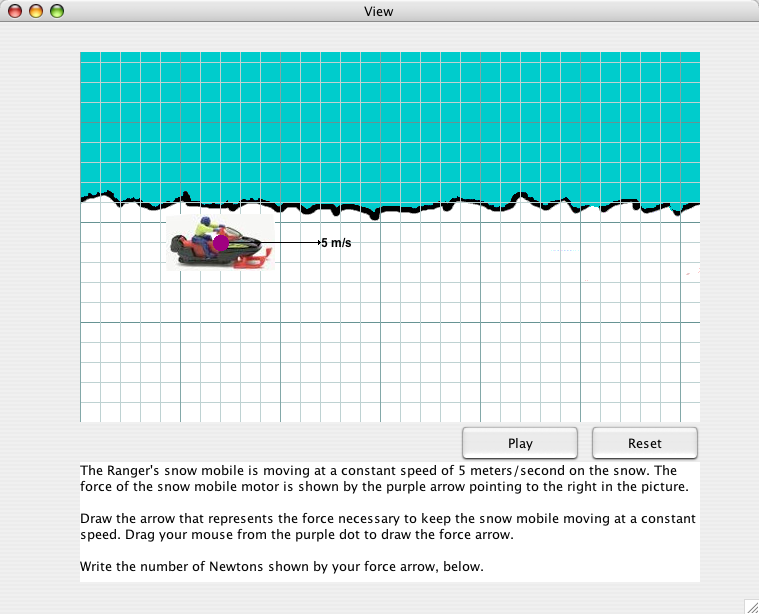
Here is the text prompt for this scene:
The Ranger's snow mobile is moving at a constant speed of 5 meters/second on the snow.
The force of the snow mobile motor is shown by the purple arrow pointing to the right in the picture.

Draw the arrow that represents the force necessary to keep the snow mobile moving at a constant speed.
Drag your mouse from the purple dot to draw the force arrow.

Write the number of Newtons shown by your force arrow, below.
<text box>
Let's present our instructions to the student. The instructions are a long string, so we'll create a global String variable. Right-click and choose Edit Strings... Click the Add button. For variable name, enter instructionsScene1Text. In the text area below the String variable name, paste in the string above.
Next, do Edit View on the Sled Forces note, add a New Placement and New Component for the placement, called instructionsView. For Class Name, choose JTextArea. Arrange this text area below the simulation.
Since we might want to use this instructions node in other scenes, we can initialize things like ability to edit and word wrap in the root node so it happens every time (since instructionsView, and any component you create is global).
Next, create a play button called startButton and a reset button called resetButton. Make them JButtons and place them under the simulation. Right-click and choose Edit Strings to define two more text strings: startButtonText ("Play") and resetButtonText ("Reset").
Now let's paste in all the code for the handlers and buttons.
Copy this code into the root node:
// Rescue 1 node

var sledAtom;
var sledForces;

var savedScene = null;
var showTimer;
var seconds;
var backgroundColor = new Color(255/255,255/255,255/255);
var atomColor = new Color(0/255,180/255,0/255);
var radius=9.9
var iX=1;
var iY=1;
var iconAtom=""
var iconForceBooster=""
var fd=null;
var stepWorld = 40;
var world;
var container;

function enter() {
   // initialization things that we have to do for all components
   instructionsView.setText(instructionsScene1Text);
   instructionsView.setEditable(false);
   instructionsView.setLineWrap(true);
   instructionsView.setWrapStyleWord(true);

   startButton.setText(startButtonText);
   resetButton.setText(resetButtonText);
}
(Ed actually just emailed us his jar file and we opened a new ACE editor and copied and pasted the code from his example to ours.)
Next, lets add the handlers into the Sled Forces node. Here is all of the code for that node, updated with the handlers:
// Sled Forces
var forceDown = false;
var forceUp = false;
var forceUp2 = false;
var forceNum;
var forceResist;
var appliedForces;
var triedNum = 0;

var clearHandler =
{
	actionPerformed: function(evt)
	{
	 	sledForces.clearForces();
		forceDown=false;
		forceUp=false;
		forceUp2=false;
		objectView.repaint();
	}
};
var clearListener = new ActionListener(clearHandler);

var startHandler =
{
	actionPerformed: function(evt)
	{
		if (world.isRunning())
		{
			objectView.stop()
			setupPlayButton("play")
			objectView.repaint()
		}
		else
		{
			forceNum=sledForces.getNumbAppliedForces();
			var studentForce = forceNum;
			//login.logAction(3,"Student added "+studentForce+" forces on the boat.");
			appliedForces=new Array(forceNum);
			triedNum+=1;
			for(var i=0;i<forceNum;i++)
			{

				appliedForces[i]=sledForces.getNthForce(i);
				var f_x=appliedForces[i].getProjectionX(null);
				var f_y=appliedForces[i].getProjectionY(null);
				if(f_y>=-0.01&&f_y<=0.01&&f_x<=-2.99 &&f_x>=-3.01)
					forceResist=true;
				//login.logAction(5,"Force"+i+"     =( "+f_x+","+ f_y+")");
			}
			if(forceNum<1)
			{
				sledForces.setCollisionSensitive(false);
				//if (warnBox.getText()!=noForceOnBoat2)
				//	warnBox.setText(noForceOnBoat2);
			}
			else
			{
				sledForces.setCollisionSensitive(true);
			}
			objectView.start();
            sledForces.setVisible(false);
			setupPlayButton("pause")
			objectView.repaint();
		}
	}
};
var startListener = new ActionListener(startHandler);

var resetHandler =
{
	actionPerformed: function(evt)
	{
		setupPlayButton("play")
		sledAtom.clearForces()
	 	sledForces.clearForces();
		sledForces.setVisible(true);
		objectView.reset()
		//warnBox.setText(blank);
		//warningTextShowed = false;
		startButton.setEnabled(true)
		forceDown=false;
		forceUp=false;
		forceUp2=false;
		objectView.repaint()
	}
};
var resetListener = new ActionListener(resetHandler);

function setupPlayButton(strL)
{
	if (strL.equals("play"))
	{
		startButton.setText("Play");
		startButton.setToolTipText("Click here to start the model.");
	}
	else if (strL.equals("pause"))
	{
		startButton.setText("Pause");
		startButton.setToolTipText("Click here to pause the model.");
	}
}


function enter()
{
	System.out.println(currentNode.getName());
	sledForces = JImpulseDaemon.createMultiConstantForceDaemon(140,180,10,10,0,0)
	sledForces.setForceDrawMode(CCConstantForce.DRAW_MODE_ARROW);
	sledForces.clearForces();
	sledForces.setDragMode(GUIPanel.DRAG_MODE_FORCE);
	world = objectView.getWorldModel();
 	//world.addStepListener(stepsListener,50);

	sledForces.setDragMode(GUIPanel.DRAG_MODE_FORCE);

	objectView.setDaemonsDragMode(GUIPanel.DRAG_MODE_DAEMON);

	setupView();

 	sledAtom = JAtom.createAtom(140,180,10,5,0);
	sledAtom.setIconFromURL(currentNode.getResource("Resources/snowmobile.jpg"));
	objectView.setDrawAtomsThenDaemons(true);
	objectView.addElement(sledAtom);
	sledAtom.setProperty("showvel",true);
	objectView.addElement(sledForces);

	sledAtom.setProperty("showvelnumber",true);
	sledAtom.setProperty("dotrace",true);
	sledAtom.setTraceProperties(0,1,0.2*objectView.getWorldModel().getPxFromCm(1));
	objectView.setShowUnitLabels(true);
	objectView.setShowForceNumber(true);
	startButton.addActionListener(startListener);
	resetButton.addActionListener(resetListener);
}

function setupView()
{
	JPartWorld.setNeedScreenResolution(20)
	objectView.clearAll()
	objectView.clearBackgroundIcon()
	objectView.setBackground(Color.white);
	objectView.setBackgroundIcon(currentNode.getResource("Resources/snowBackground.gif"));
	objectView.setGrid()
	world = objectView.getWorldModel();
	objectView.setSnapToGrid(true, true)
	objectView.getGrid().setIntervalMajor(5,5)
	world.setDoAACollisions(true)
	objectView.setAtomsDragMode(GUIPanel.DRAG_MODE_NONE);
}
Here is a screenshot of the scene as it stands at the end of today. We'll return to this scene tomorrow and try to complete it and one other scene.
Day 2, Morning: Completing sled forces scene
We need to add a sled to our snow mobile. Here is a picture of our sled, and the sled attached to the snow mobile.
We also decided that the snow mobile and sled should be transparent to show the background, so I made them transparent gifs. You'll need to re-import the sled image and change your code to refer to .gif instead of .jpg.
Use this TRANSPARENT image instead: 
New transparent images:


So as we're developing this, we're thinking that there's too much to keep in mind in this scene. As usual, developers end up making some pedagogical and design decisions when they're in the thick of it. It can't be avoided. We decided that we'll break the scene above into two scenes:
- One that just shows the velocity and lets the student run the simulation with no force. This first scene will emphasize that this is a frame of a movie, and play button continues the movie (doesn't start the sled).
- One with a fixed engine force (like 3 newtons), and asks them draw and enter the force that keeps the snow mobile from accelerating.
We create a Show Sled node under Rescue 1. We copy code from the Load Sled node and delete everything that has to do with forces.
Next, make Show Sled the start node: Select it, and click on the red start node icon on the top left of ACE. You'll see in the bottom right that it is now the start node. Then click on the arrow icon and draw a transition from Show Sled to Sled Forces (click in Show Sled, then click in Sled Forces).
Next, copy all of the placements from Sled Forces (right-click on Sled Forces, shift-click all placements and copy, then go to Show Sled and paste). We rearrange thing to make room for the next button, and add the nextButton in Show Sled.
Then click on the transition between Show Sled and Sled Forces and add this code to the transition:
// Next button
var clicked = false;

function test()
{
        var result = clicked;
        clicked = false;
        return result;
}

var nextHandler =
{
        actionPerformed: function(event)
        {
                clicked = true;
                currentNode.next();
        }
};
var listener = new ActionListener(nextHandler);

// activitate is called automatically on all outgoing arcs
// when a node is entered
function activate()
{
        clicked = false;
        nextButton.addActionListener(listener);
}


// dectivitate is called automatically on all outgoing arcs
// when a node is exited
function deactivate()
{
        clicked = false;
        nextButton.removeActionListener(listener);
}
Also add to the background node enter script
nextButton.setText(nextButtonText);
and define the nextButtonText string ("Next").
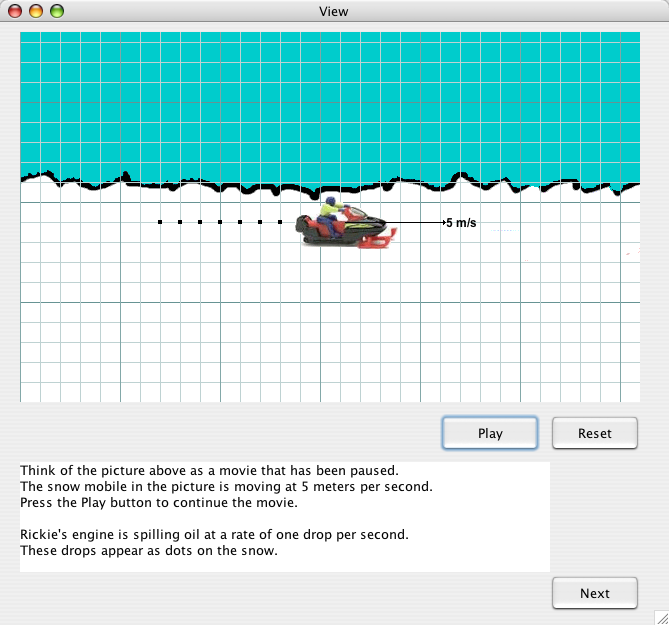
We also need to define instruction text for this node. We move the instructionsView initializiation out of the background enter function and into the enter function of each node, setting the appropriate text string for the current node. For the Show Sled node, we'll use the following instructions:
Think of the picture above as a movie that has been paused.
The snow mobile in the picture is moving at 5 meters per second.
Press the Play button to continue the movie.

Rickie's engine is spilling oil at a rate of one drop per second.
These drops appear as dots on the snow.
Here is the code for Show Sled:
// Show Sled
// Just show an interface that lets you play the sled going
// at constant motion

var clearHandler =
{
	actionPerformed: function(evt)
	{
		objectView.repaint();
	}
};
var clearListener = new ActionListener(clearHandler);

var startHandler =
{
	actionPerformed: function(evt)
	{
		if (world.isRunning())
		{
			objectView.stop()
			setupPlayButton("play")
			objectView.repaint()
		}
		else
		{
			objectView.start();
			setupPlayButton("pause")
			objectView.repaint();
		}
	}
};
var startListener = new ActionListener(startHandler);

var resetHandler =
{
	actionPerformed: function(evt)
	{
		setupPlayButton("play")
		sledAtom.clearForces()
		objectView.reset()
		//warnBox.setText(blank);
		//warningTextShowed = false;
		startButton.setEnabled(true)
		objectView.repaint()
	}
};
var resetListener = new ActionListener(resetHandler);

function setupPlayButton(strL)
{
	if (strL.equals("play"))
	{
		startButton.setText("Play");
		startButton.setToolTipText("Click here to start the model.");
	}
	else if (strL.equals("pause"))
	{
		startButton.setText("Pause");
		startButton.setToolTipText("Click here to pause the model.");
	}
}

function enter()
{
    // remove all forces code -- we're not applying forces

	world = objectView.getWorldModel();
 	//world.addStepListener(stepsListener,50);

	setupView();

 	sledAtom = JAtom.createAtom(140,180,10,5,0);
	sledAtom.setIconFromURL(currentNode.getResource("Resources/snowmobile.gif"));
	objectView.addElement(sledAtom);
	sledAtom.setProperty("showvel",true);

	sledAtom.setProperty("showvelnumber",true);
	sledAtom.setProperty("dotrace",true);
	sledAtom.setTraceProperties(0,1,0.2*objectView.getWorldModel().getPxFromCm(1));
	objectView.setShowUnitLabels(true);
	startButton.addActionListener(startListener);
	resetButton.addActionListener(resetListener);

    // set this page's instructions
    instructionsView.setText(instructionsShowSledText);
}

function setupView()
{
	JPartWorld.setNeedScreenResolution(20)
	objectView.clearAll()
	objectView.clearBackgroundIcon()
	objectView.setBackground(Color.white);
	objectView.setBackgroundIcon(currentNode.getResource("Resources/snowBackground.gif"));
	objectView.setGrid()
	world = objectView.getWorldModel();
	objectView.setSnapToGrid(true, true)
	objectView.getGrid().setIntervalMajor(5,5)
	world.setDoAACollisions(true)
	objectView.setAtomsDragMode(GUIPanel.DRAG_MODE_NONE);
}
Next, we'll make the view in Show Sled our template view that other nodes will inherit from. Set up Show Sled view as you like it, then open Sled Forces view, delete every placement, and right-click and choose Inherit View and select Show Sled.
We'll add one extra question to Sled Forces, to prompt the student for the number of newtons in their force. We'll use an assessment object for this, which is in the assessment.jar file. We don't have this jar yet. So create a new placement, Select Class, use Add URL to add Assessment/lib/assessment.jar to whatever codebase URL appears. Then select BlankFill class. We create a promptNewtonsText string and set the text to
The force I created is ___ newtons.
With a BlankFill object, the underline will become a text field for the student.
Add a line to Sled Forces enter method to set the text of promptForNewtons.
    // set prompt
    promptForNewtons.setText(promptNewtonsText);
Here's the first scene at the lunch break on day 2:
(Note that at this point we have somehow introduced a bug in scene 2--it's not running. It runs fine if that scene is first, so there must be some dependency we've broken in the first scene. We'll debug after lunch.
After lunch, we quickly surmise that the problem is that the buttons have two action listeners on them--one from each scene. We add an exit method to the Show Sled and Sled Forces nodes, as follows, and it works now!
function exit()
{
	startButton.removeActionListener(startListener);
	resetButton.removeActionListener(resetListener);
	objectView.removeElement(sledAtom);
}
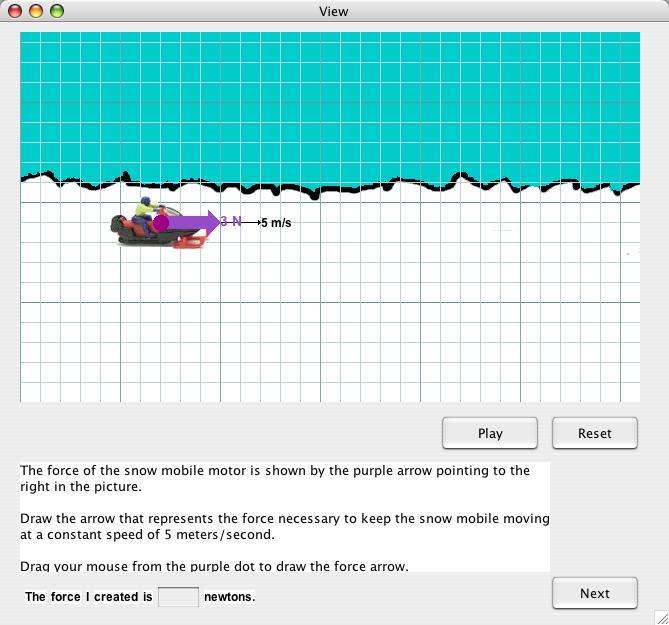
Next, we apply the constant motor force to the sled. In Sled Forces, add
// Sled Forces
var motorForce;

(in enter method:)
....
    // create a constant force
    motorForce = new CCConstantForce(3.0, 0);
    motorForce.setDrawMode(CCConstantForce.DRAW_MODE_ARROW);
...
    sledAtom.applyForce(motorForce);
and in resetHandler, add sledAtom.applyForce(motorForce) after sledAtom.clearForces() since reset needs to put the motor force back on the sled after all forces have been cleared.
So now for scene 2 (when you press the Next button) we have:
Here is a snapshot of our activity (jar) at this point:
Rescue activity file for scenes 1 and 2
Day 2, Afternoon: Adding effects of surface on speed of sled scene
For this scene, we need 2 snowmobiles. Here are a couple more, using PhotoShop Image/Adjustments/Hue-Saturation

And here is a background with a wet patch for one mobile to go over.
Import all of these images into your activity.
Next we create a Slush node for this page. The transition arc from Sled Forces to Slush is done as a prototype, copying the code from the earlier transition. In the transition we just put this comment:
// Sled Forces to Slush transition.
// This transistion uses the script prototype
// feature. It takes the script string from
// Show Sled -> Sled Forces transition and copies
// it here. We don't see it, unfortunatly, but
// if you right-click and choose Set Prototype
// from the transition arrow you'll see that the
// other transition is selected as as prototype.
// Ideally the script would appear here in a
// non-editable form.
For the Slush node itself, we need to create 2 atoms, one for each snow mobile. One goes over slush, and one doesn't. The one that goes over slush gets a negative boost applied to it. Dyanmica has boosters, and we're looking into how to do that.
In the meantime, create a view for Slush node that shows the simulation. We're not going to inherit the Show Sled view here, but we can reuse the objectView component. Create a new placement and select objectView and then Set Component. You might want to resize your window to make it more similar in size to the previous two windows. Reuse the start, reset, next button, and instructions components (just select and Set Component) and add instructionsSlushText String as follows:
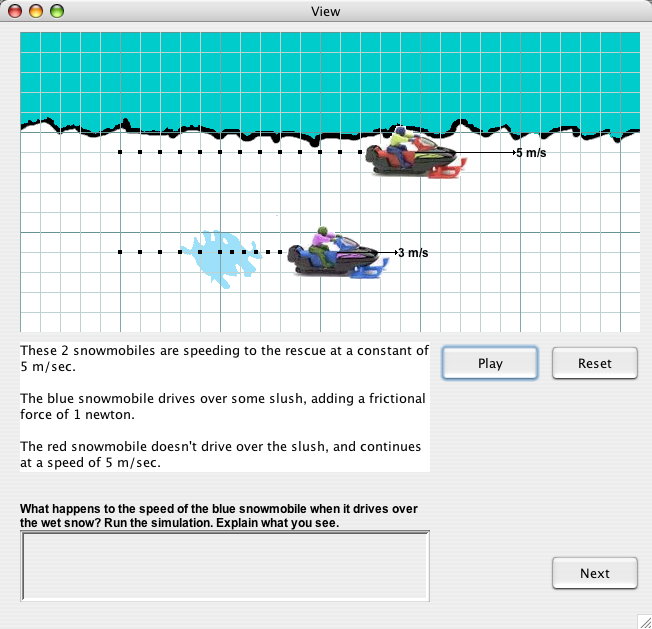
These 2 snowmobiles are speeding to the rescue at a constant of 5 m/sec.

The blue snowmobile drives over some slush, adding a frictional force of 1 newtons.

The red snowmobile doesn't drive over the slush, and continues at a speed of 5 m/sec.
Also make an EssayFill object (promptForSlushExplanation) for the essay, and promptSlushText String and set the essay question on the object.
What happens to the speed of the blue snowmobile when it drives over the slush? Run the simulation.
Explain what you see.
Here is the code for the Slush node, with 2 mobiles and a booster:
// Slush

var sledAtomSlush;


var startHandler =
{
	actionPerformed: function(evt)
	{
		if (world.isRunning())
		{
			objectView.stop()
			setupPlayButton("play")
			objectView.repaint()
		}
		else
		{
			objectView.start();
			setupPlayButton("pause")
			objectView.repaint();
		}
	}
};
var startListener = new ActionListener(startHandler);

var resetHandler =
{
	actionPerformed: function(evt)
	{
		setupPlayButton("play")
		sledAtom.clearForces();
        sledAtomSlush.clearForces();
		objectView.reset()
		//warnBox.setText(blank);
		//warningTextShowed = false;
		startButton.setEnabled(true)
		objectView.repaint()
	}
};
var resetListener = new ActionListener(resetHandler);

function setupPlayButton(strL)
{
	if (strL.equals("play"))
	{
		startButton.setText("Play");
		startButton.setToolTipText("Click here to start the model.");
	}
	else if (strL.equals("pause"))
	{
		startButton.setText("Pause");
		startButton.setToolTipText("Click here to pause the model.");
	}
}

function enter()
{

	world = objectView.getWorldModel();
 	//world.addStepListener(stepsListener,50);

	setupView();

    // first snow mobile
 	sledAtom = JAtom.createAtom(100,180,10,5,0);
	sledAtom.setIconFromURL(currentNode.getResource("Resources/snowmobile.gif"));
	objectView.addElement(sledAtom);
	sledAtom.setProperty("showvel",true);
	sledAtom.setProperty("showvelnumber",true);
	sledAtom.setProperty("dotrace",true);
	sledAtom.setTraceProperties(0,1,0.2*objectView.getWorldModel().getPxFromCm(1));

    // second snow mobile over slush
 	sledAtomSlush = JAtom.createAtom(100,80,10,5,0);
	sledAtomSlush.setIconFromURL(currentNode.getResource("Resources/snowmobileBlue.gif"));
	objectView.addElement(sledAtomSlush);
	sledAtomSlush.setProperty("showvel",true);
	sledAtomSlush.setProperty("showvelnumber",true);
	sledAtomSlush.setProperty("dotrace",true);
	sledAtomSlush.setTraceProperties(0,1,0.2*objectView.getWorldModel().getPxFromCm(1));

    // create the slush (negative) booster with small negative x boost
    booster = JBooster.createBooster(200, 80, 1, 1, -2, 0);
    booster.setDraggable(false);
    booster.setVisible(false);
    objectView.addElement(booster);

	objectView.setShowUnitLabels(true);
	startButton.addActionListener(startListener);
	resetButton.addActionListener(resetListener);

    // set this page's instructions
    instructionsView.setText(instructionsSlushText);

    // explanation field
    promptForSlushExplanation.setText(promptSlushText);
}

function setupView()
{
	JPartWorld.setNeedScreenResolution(20)
	objectView.clearAll()
	objectView.clearBackgroundIcon()
	objectView.setBackground(Color.white);
	objectView.setBackgroundIcon(currentNode.getResource("Resources/snowBackgroundWetPatch.gif"));
	objectView.setGrid()
	world = objectView.getWorldModel();
	objectView.setSnapToGrid(true, true)
	objectView.getGrid().setIntervalMajor(5,5)
	world.setDoAACollisions(true)
	objectView.setAtomsDragMode(GUIPanel.DRAG_MODE_NONE);
}

function exit()
{
	startButton.removeActionListener(startListener);
	resetButton.removeActionListener(resetListener);
	objectView.removeElement(sledAtom);
	objectView.removeElement(sledAtomSlush);
}
And here is our slushy scene!
Now we'll add a graph!
Import DataGraph from DataGraph/lib/datagraph.jar
Create a new node called Slush Graph, and a transition from Slush to this node. Set Prototype on the transition to use the next button code as we did before. Hm, can we just do Set Prototype on the node to have it use the Slush node code? Ed isn't sure, we try it.
Oops! Framework bug. The activity just got corrupted. Not sure if it was the DataGraph or the Set Prototype on node stuff. Thank goodness we recorded all of our work here. Patti will take the jar snapshot she made at 2 pm and apply the changes UP TO the graph and post that version here later.
Here is the rescued jar for scenes 1-3:
Rescue: 3 scenes file